Discovering the art of sketching footwear holds the promise of an enjoyable and fulfilling journey for creatives at any skill level. Whether you harbor dreams of becoming a fashion maestro, are a burgeoning artist on the rise, or simply yearn to infuse a dash of stylish panache into your visual creations, this comprehensive guide is your compass to crafting authentic shoe depictions. Within this instructive narrative, we will deconstruct this intricate process into a series of accessible and well-defined stages, generously sprinkled with expert insights aimed at elevating your prowess in the realm of illustration.
Preparing for Your Drawing Session
Embarking on a drawing project requires assembling the necessary tools to ensure a smooth and productive experience. Here’s what you’ll need:
- Graphite Pencils: A range of pencils from hard (H) to soft (B) grades will provide versatility in your drawing;
- High-Quality Eraser: Opt for a kneadable eraser for precision and a regular one for broader corrections;
- Drawing Paper: Choose a paper that suits your style, whether it’s smooth for fine lines or textured for a more expressive approach;
- Visual References: Collect images of the shoes you plan to sketch. These could be photographs or digital images.
Tips:
- Organize your materials in an easily accessible manner;
- Consider the lighting in your workspace to ensure clear visibility of your materials and reference images.
Analyzing Your Shoe Reference
To accurately capture the essence of the shoes you wish to draw, a thorough analysis of your references is essential. Here’s how to proceed:
- Shape and Structure: Observe the overall shape of the shoe. Notice the curves, edges, and how different parts connect;
- Size and Proportions: Measure the dimensions in your reference to maintain proportionality in your drawing;
- Details and Texture: Pay attention to laces, stitching, patterns, and any unique features;
- Perspective and Angles: Identify the viewpoint of the shoe in your reference. This will guide you in replicating the correct angles and depth.
Recommendations:
- Create small thumbnail sketches to practice the proportions and angles;
- Use a grid method if you’re having difficulty with sizes and proportions.
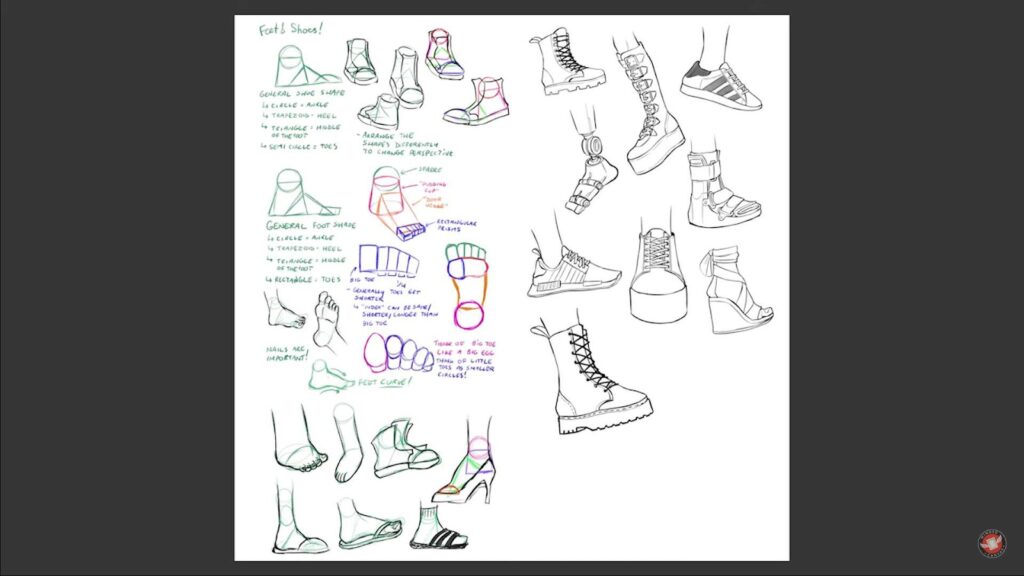
Laying the Groundwork with Geometric Forms
Begin the shoe sketching process by mapping out the fundamental geometry. Use a faint, erasable pencil to draw. Start with the base, drawing rectangles to represent the soles. For the upper portion of the shoes, employ simple oval shapes. This step is crucial as it establishes a solid framework for the entire drawing. Keep in mind:
- Use light strokes to make adjustments easier;
- Focus on proportions to ensure accuracy;
- Remember, this is just a preliminary step; perfection is not the goal here.
Sculpting the Shoe’s Silhouette
In this phase, transform the basic shapes into a more detailed outline of the shoe. Introduce curves and lines to emulate the shoe’s natural contours. Pay special attention to unique features such as laces, straps, or the heel design, which give the shoe its character. At this point, it’s important to:
- Maintain light, gentle strokes to allow for easy modifications;
- Observe and replicate the shoe’s distinctive elements for realism;
- Consider this stage as setting the stage for finer details to be added later;
- Keep the drawing fluid and dynamic, avoiding stiff or rigid lines.
Incorporating Intricate Details
In this phase, the focus shifts to the meticulous addition of fine details such as stitching, seams, and decorative elements like logos or unique patterns. This stage is crucial for breathing life into the drawing, transforming it from a basic outline to a more intricate and visually appealing representation.
Key Strategies:
- Precision is Key: Emphasize the importance of precision in this step. Every stitch and seam should be carefully drawn, as these small elements greatly enhance the realism and attractiveness of the shoe design;
- Variety in Detailing: Encourage the use of different patterns or textures to add uniqueness to the shoe design. Whether it’s a classic argyle pattern or a modern geometric design, the addition of such elements can significantly elevate the aesthetic appeal of the shoes.
Expert Tips:
- Tool Selection: Recommend the use of a fine-tipped pencil or a mechanical pencil. These tools offer better control and are ideal for adding intricate details that demand precision;
- Reference Images: Suggest keeping reference images handy to accurately replicate details like specific stitching patterns or brand logos.
Mastering Shading and Texture
This step is about adding depth and realism through shading and texturing techniques. Shading is not just about making an area dark or light; it’s about understanding how light interacts with the object, creating a sense of dimension and material texture.
Effective Techniques:
- Observational Skills: Highlight the importance of observing how light behaves. Encourage the examination of reference images to understand light and shadow dynamics on different materials and surfaces of the shoes;
- Gradual Layering: Stress on starting with lighter shades and gradually progressing to darker tones. This approach allows for more control and helps in achieving a more natural and gradual transition in the shading.
Pro Tips:
- Shading Practice: Encourage practicing shading on a separate piece of paper. This practice can help in understanding how different pencil pressures affect the darkness and texture of the shade;
- Hatching and Cross-Hatching: Introduce these techniques as effective methods for creating texture and depth. Explain how different patterns of hatching can simulate various textures, from the smoothness of leather to the roughness of canvas.
Enhancing Depth and Shine
In this stage, focus on infusing vitality and dimension into the footwear illustration. Achieve this by adding strategic highlights, which impart a glossy, lifelike appearance. Consider these aspects:
- Identify Light Sources: Understand where light naturally falls on the shoes. This could vary based on the setting, whether indoor or outdoor;
- Adding Highlights: Use a lighter pencil or a fine eraser to gently remove some of the previously applied shading. This technique creates bright spots that mimic the way light reflects off a glossy surface;
- Subtlety is Key: Avoid overdoing the highlights. Subtle touches often create a more realistic effect.
Tips for Effective Highlighting:
- Experiment with different erasers (kneaded, plastic, gum) to see which gives the best effect;
- Practice on scrap paper to perfect the pressure and stroke needed for natural-looking highlights.
Polishing and Perfecting
This final phase is about refining and sharpening the drawing to achieve a professional, polished look.
- Bold Outlines: Reinforce the drawing’s outlines with a darker pencil grade. This contrast adds depth and makes the image pop;
- Attention to Detail: Revisit every part of the drawing, adding fine details or textures where necessary. This can include laces, seams, or the texture of the shoe material;
- Eradicate Smudges: Carefully erase any accidental marks, smudges, or stray lines that distract from the cleanliness of the final piece.
Recommendations for a Flawless Finish:
- Use a clean, sharp eraser to avoid smearing graphite;
- Consider using a fine-tip pen for ultra-sharp lines, if the style of the drawing allows;
- Place a clean sheet of paper under your drawing hand to prevent smudging as you work.
Elevating Your Shoe Drawing with a Background
Adding a background to your shoe illustration can significantly boost its visual appeal. This step, while not mandatory, offers an opportunity to elevate your artwork. Here are some suggestions:
- Colored Backgrounds: Opt for a subtle, monochromatic shade that complements the colors of your shoe. This approach can make your drawing pop without overpowering the main subject;
- Creating Depth with Shadows: Introduce shadows under the shoes. This technique gives a sense of grounding and realism. Experiment with different light sources and shadow lengths to see how they affect the perception of your drawing;
- Contextual Backgrounds: If you’re feeling adventurous, draw a context-specific background. For instance, sneakers might be set against a street or park backdrop, while formal shoes could be paired with an elegant, indoor setting;
- Use Textures: Experiment with different textures in the background. This can add a tactile quality to your drawing, making it more engaging.
Mastery Through Practice and Experimentation
Improving at shoe drawing is a journey that involves consistent practice and a willingness to experiment. Here’s how you can enhance your skills:
- Regular Practice: Set aside time each day or week for drawing. Consistency is key in skill development;
- Explore Various Styles: Don’t limit yourself to one type of shoe. Try drawing boots, sandals, high heels, and sports shoes to understand different shapes and designs;
- Material Matters: Experiment with how different materials look, like leather, canvas, or suede. Notice how light interacts with these materials differently;
- Different Angles: Practice drawing shoes from multiple perspectives – side, top, angled views. This will help you understand the structure and form of shoes better;
- Embrace Mistakes: Every error is a learning opportunity. Analyze what didn’t work and why, and use that knowledge to improve your next drawing;
- Seek Inspiration: Look at other artists’ work for inspiration. Notice their style, technique, and how they handle details and incorporate some of these observations into your own work;
- Feedback and Learning: Share your work with others and be open to constructive criticism. It can provide new perspectives and improvement areas you might not have considered.
Remember, the journey in art is as important as the destination. Enjoy the process of creating and learning, and watch your skills flourish over time.
Conclusion
Discovering the art of sketching shoes can prove to be an enriching adventure for both artists and aficionados of fashion. As you embark on this creative journey, adhering to the comprehensive instructions provided herein and dedicating consistent effort to your practice will enable you to refine your artistic abilities and craft remarkable depictions of footwear. It’s crucial to keep in mind the importance of utilizing reference images, meticulously attending to intricacies, and relishing the process of delving into diverse shoe designs. So, here’s to your joyful exploration of the world of shoe illustration—happy drawing!